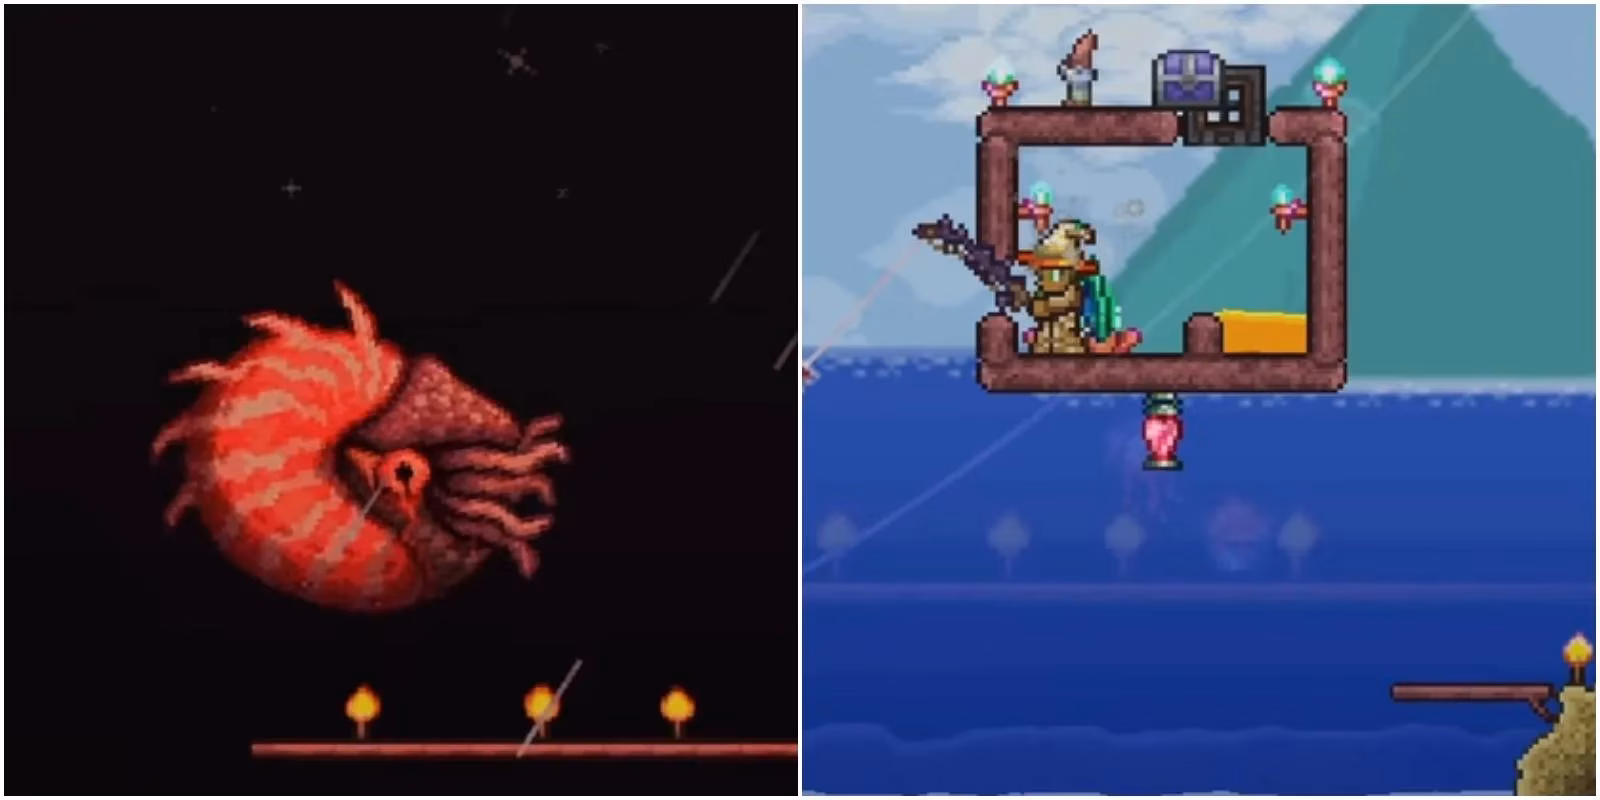
If there’s one underwater nightmare that still makes my hands tremble even in 2026, it’s the Dreadnautilus. The first time I hooked that blood‑red cephalopod during a Blood Moon, I thought my fully geared Hardmode character was ready for anything. I was wrong. Within seconds, my health bar evaporated under a barrage of crimson projectiles, and my spirit crumbled faster than a sandcastle in a tsunami. But after many, many failed attempts, I cracked the code. This isn’t just another guide—it’s the story of how I turned this spiral‑shelled terror into a loot piñata, and how you can too.
The Dreadnautilus isn’t a traditional boss—there’s no summoning item, no dramatic health bar spanning the screen. Yet it fights with the ferocity of one, and its stats are nothing to scoff at. In fact, I’ve seen veteran players get demolished because they underestimated this briny beast. It’s one of five special enemies that can ambush you when you reel in a catch during a Blood Moon. The others—the Wandering Eye Fish, Zombie Merman, Blood Eel, and Hemogoblin Shark—are all violent, but the Dreadnautilus is the undisputed king of pain, especially because it can automatically deflect your projectiles under certain conditions.
How to Find This Salty Menace
Spawning the Dreadnautilus is both simple and maddeningly luck‑based. You have to go fishing in any body of water during a Blood Moon. No special bait required, no secret seed—just a rod, a Blood Moon, and a prayer. The chance of it appearing is about 10% per cast that spawns an enemy, meaning you might need to sit there for several in‑game nights. I’ve spent entire Blood Moons pulling up nothing but Hemogoblin Sharks before the Dreadnautilus finally showed up, and by then my nerves were fried.
One crucial thing: the moment dawn breaks, the Dreadnautilus will simply vanish. No loot, no satisfaction, just an empty ocean and a deep sense of regret. So if you see those first rays of sunlight, don’t waste ammo trying to finish it off—just make a mental note to start earlier next time. It’s always a race against the clock.

Understanding Its Attack Patterns
To beat this creature, you have to learn its rhythm. The Dreadnautilus has a few very distinct moves, and once you can read them, the fight transforms from a chaotic slaughter into a tense but manageable dance.
The Deflecting Dash
When it turns away from you and charges up for about a second, your gut reaction might be to fire everything you’ve got. Don’t. During that charge, every projectile you send its way will bounce off harmlessly. It’s basically a big middle finger to rangers and mages. After the charge, it dashes at you at ridiculous speed, circling and trying to body‑slam you repeatedly. This attack is brutal, but it’s also your chance to get creative with melee weapons if you time it right.
The Blood Vomit Volley
Now, when the Dreadnautilus faces you directly and starts charging, that’s your golden opening. For that one second, it cannot deflect attacks. Unload everything you’ve got. After the charge, it spits three volleys of dripping red projectiles that look like something straight out of a horror movie. Each volley pushes it back a bit due to recoil, so you can almost see it bobbing in the water as it pelts you. These projectiles can be wall‑blocked, which is a lifesaver.

The Summoner’s Sigils
If the fight wasn’t already messy enough, the Dreadnautilus uses foul cephalopod magic to conjure up to three glowing red symbols. Each one spawns a Blood Squid, and while only three can exist at once, they respawn as soon as you kill one. Those squids will harass you relentlessly, nipping at your health while you’re trying to dodge the main threat. I can’t count the number of times a stray squid finished me off just as I was about to land the killing blow.
My Hard‑Earned Strategies
After dozens of deaths, I developed a setup that turns the tide. It’s not flashy, but it works.
Box Yourself In
This might sound cowardly, but building a solid box of platforms or blocks around yourself neutralizes the projectile vomit entirely. The Dreadnautilus can fly, so you’ll need to block all sides, leaving only small openings if you plan to shoot out. I prefer to sit inside a structure with a honey pool and a campfire, using a weapon that can fire through walls, like the Daedalus Stormbow with Holy Arrows or a strong sentry you can place outside. The box also helps against the Blood Squids since they can’t reach you as easily.
Stay Above Ground Level
Fighting underwater is a nightmare because movement is sluggish and vision gets obscured. I always build a platform a few blocks above the ocean’s surface, or even better, fight it over land if I can lure it away from the deep sea. From an elevated position, you can track its dash trajectory much more clearly and react with a quick hook or a double‑jump.
Use Its Dash Against It
Remember that while the Dreadnautilus is dashing, it’s actually vulnerable to melee damage. If you’ve got a powerful melee weapon like a Terra Blade or a whip, you can stand near a gap in your box and swing as it zooms by. This technique requires perfect timing, but when it connects, the fight shortens dramatically.
Call Your Own Reinforcements
Blood Squids making your life miserable? Fight fire with fire. Equip a summon weapon—even a simple one like the Spider Staff—and let your minions handle the squids. Sentries are fantastic too; I like placing a Frost Hydra or a Queen Spider right outside my box so the squids meet their maker before they even reach me. This lets me focus 100% on the Dreadnautilus.
Melting Its Armor with Ichor
The real secret sauce, however, is exploiting the Ichor debuff. The Dreadnautilus has naturally high defense, so even high‑tier weapons can tickle it without some help. Applying Ichor reduces its defense by 15 points on PC or 20 on console, which is a massive swing in damage output. Since 2026 hasn’t changed this mechanic (as far as I know from the latest patches), it remains the single most impactful debuff you can bring to this fight.
Here are the primary ways to dish out that glorious golden goo:
| Weapon / Projectile | Class | How to Get It |
|---|---|---|
| Golden Shower | Magic | Crafted with a Spell Tome, Ichor, and Souls of Night |
| Flask of Ichor | Melee | Crafted at an Imbuing Station with Ichor and Bottled Water |
| Ichor Bullets | Ranged | Crafted with Musket Balls and Ichor |
| Ichor Arrows | Ranged | Crafted with Wooden Arrows and Ichor |
| Ichor Darts | Ranged | Pre‑Hardmode variant (less known, but effective) |
| Any melee weapon imbued via Flask of Ichor | Melee | Temporarily causes Ichor on hit |
I personally carry a stack of Ichor Bullets for my Megashark and a Flask of Ichor for my whip, so no matter which weapon I’m using, the debuff stays applied. The moment that yellowish sheen covers the Dreadnautilus, my damage numbers nearly double.

The Spoils of Victory
After you finally shatter that spiraling shell, the loot doesn’t disappoint. While I won’t spoil every drop, the Sanguine Staff is the crown jewel—a summon weapon that calls a little blood bat to fight for you, and it absolutely shreds early Hardmode enemies. There’s also a chance for the Blood Moon Monolith, a neat vanity item that keeps the eerie red glow in your base. Trust me, after all that struggle, seeing your inventory fill up with rare goodies makes the frustration worthwhile.
Final Thoughts (and a Little Encouragement)
I know it’s disheartening when a “non‑boss” wipes you off the map time and again. But the Dreadnautilus is really a skill check disguised as a random encounter. Once you understand its tells, block its projectiles, and strip its armor with Ichor, the fight becomes less about luck and more about patience. And honestly, there’s a unique thrill in conquering a creature that so many players fear. So rig up your box, sharpen your weapons, and go fishing under the next Blood Moon. The sea fiend is waiting—and this time, you’re ready.